
The primary objective of this setup is to provide secure and convenient access to internal homelab services from any location without direct exposure to the public internet. This is achieved by leveraging a trusted mesh VPN (Tailscale), a flexible reverse proxy (Caddy), and robust DNS management (Cloudflare).
Core Components
Tailscale: The Secure Network Fabric
Tailscale establishes a private, encrypted mesh network connecting all authenticated devices and homelab servers.
- Access Control: Remote access to any homelab service is exclusively facilitated through a client device connected to the Tailscale network. Direct public internet exposure of services is actively avoided.
- Internal Routing: All inter-service communication within the homelab, including Caddy’s forwarding of requests to backend services, occurs over Tailscale’s encrypted tunnels using their respective Tailscale IP addresses.
Caddy: Reverse Proxy and SSL Automation
Caddy functions as the central reverse proxy within the Tailscale network.
- Deployment: Caddy is deployed on a designated server within the Tailscale network.
- Custom Domain Handling: It is configured to manage custom domain names (e.g.,
jellyfin.bndct.dev,unraid.bndct.dev), acting as the primary entry point for these domains. - Request Routing: Upon receiving a request for a custom domain, Caddy intelligently proxies the request to the corresponding internal homelab service. This routing is performed using the Tailscale IP address of the target service, ensuring traffic remains within the secure Tailscale mesh.
- Automated HTTPS: Caddy automatically provisions and renews SSL certificates (e.g., via Let’s Encrypt) for all configured custom domains. This ensures all client-to-Caddy connections are secured with HTTPS.
Cloudflare DNS: Domain Management and SSL Challenge Facilitator
Cloudflare serves as the authoritative DNS provider for the custom domain (bndct.dev).
- DNS Resolution: Cloudflare manages the public DNS records for the custom domain. These records are configured to resolve to the Tailscale IP address of the Caddy server. This ensures that while DNS resolution is public, the resolved IP is only routable from within the Tailscale network.
- DNS-01 Challenge Integration: Caddy leverages Cloudflare’s API to perform the DNS-01 challenge required for SSL certificate validation. This automated process involves Caddy temporarily creating and verifying specific DNS TXT records via Cloudflare’s API.
Operational Flow
The following steps outline the process for accessing a homelab service:
- Client Connection: The user’s client device establishes a connection to the Tailscale network.
- DNS Query: The user initiates access by navigating to a custom domain (e.g.,
plex.bndct.dev) in their browser. The DNS query for this domain is resolved by Cloudflare, which returns the Tailscale IP address of the Caddy server. - Secure Tunnel to Caddy: The client, being connected to Tailscale, establishes a secure, encrypted connection (HTTPS) to Caddy’s Tailscale IP address.
- Caddy Reverse Proxy: Caddy receives the request. Based on the requested custom domain, it proxies the request to the specific homelab service using that service’s dedicated Tailscale IP address.
- Service Response: The homelab service processes the request and returns data to Caddy, which then transmits it back to the client device over the secure Tailscale tunnel, maintaining HTTPS encryption.
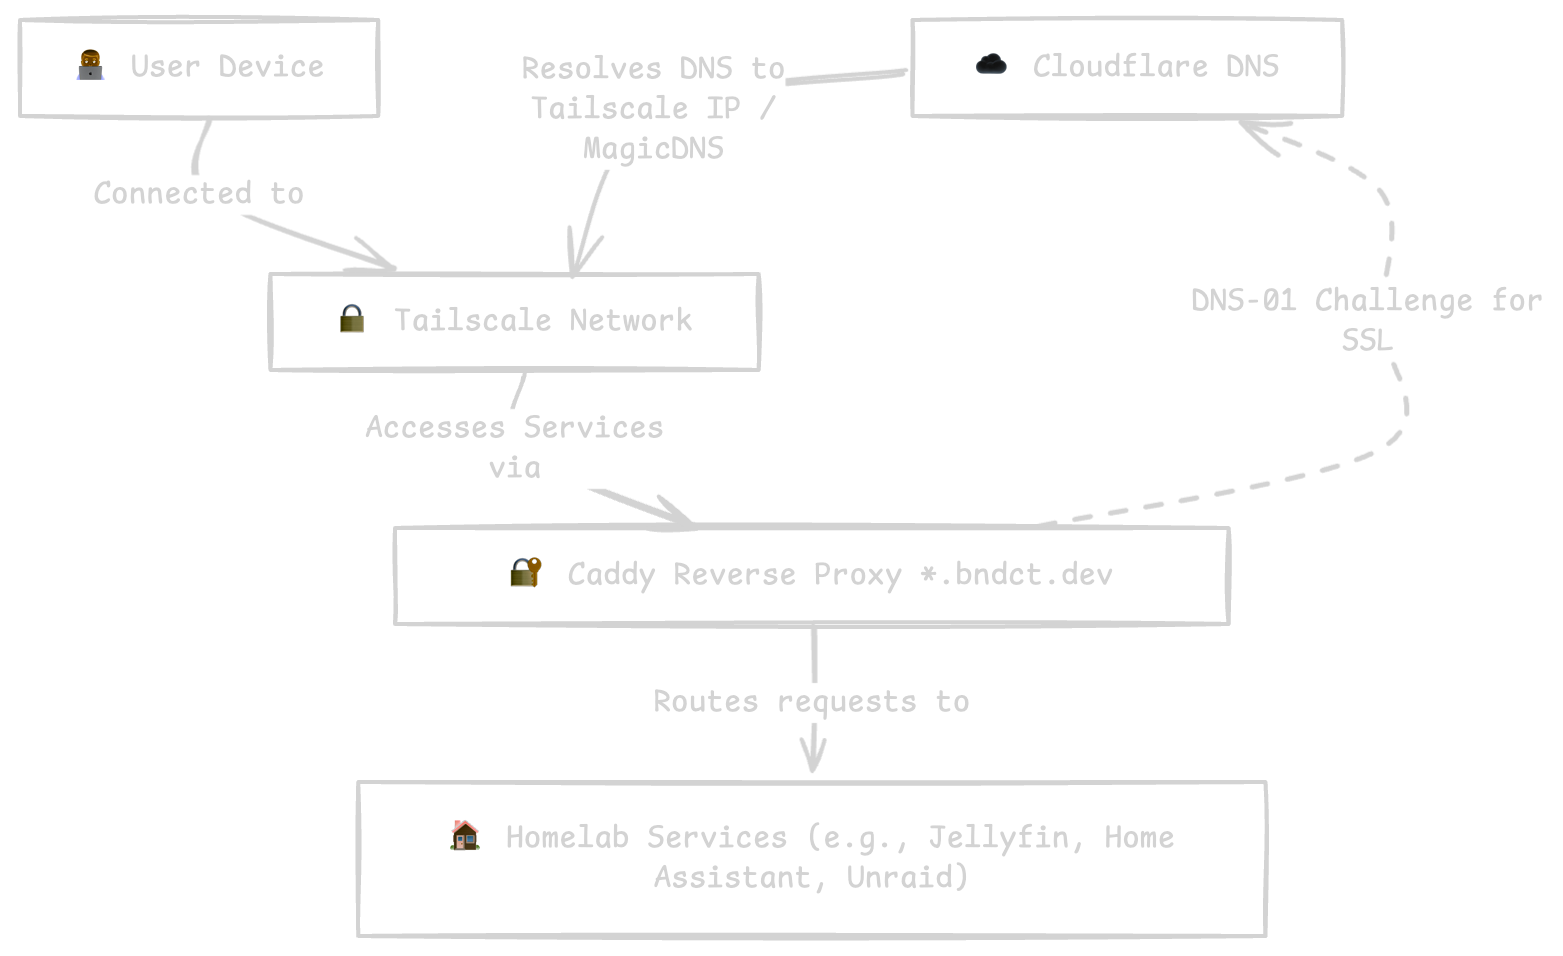
Architectural Diagram
The following diagram illustrates the described system architecture:
Configuration Advantages
This architecture provides several significant advantages:
- Enhanced Security: Services are not directly exposed to the public internet, minimizing the attack surface. All data transmission is secured by Tailscale’s encryption and Caddy’s HTTPS.
- Streamlined Access: Access via memorable custom domain names eliminates the need for recalling specific IP addresses or port numbers.
- Automated SSL Management: Caddy’s automatic certificate provisioning and renewal simplify the management of HTTPS for all services.
- Simplified Network Management: Complex router configurations such as port forwarding are eliminated.
- Scalability: Integration of new services is straightforward, involving their addition to the Tailscale network and corresponding Caddy configuration.
How-To: Implementation Steps
This section outlines the practical steps to set up the described homelab access architecture.
1. Tailscale Setup
Tailscale forms the secure backbone of your homelab network. All your homelab servers (including the one running Caddy) and client devices should be connected to your Tailscale network.
- For Unraid Users: Many Unraid containers offer native Tailscale integration. When adding a new container that you wish to connect to Tailscale, simply tick the “Use Tailscale” checkbox during the container setup. Once the container starts, monitor its logs (e.g., Docker logs) for a Tailscale authentication link. Visit this link in your browser and approve the machine to join your Tailscale network.
- For Other Operating Systems: For other Linux distributions, Windows, macOS, or Docker environments, follow the official Tailscale installation instructions. Generally, this involves running an installation script and then using
tailscale upto authenticate and connect your device to your Tailscale network.
Ensure all your homelab services that Caddy will proxy to have a unique Tailscale IP address within your network. Note down these IPs.
2. Cloudflare API Token for DNS-01 Challenge
Caddy uses a Cloudflare API token to automatically create and verify DNS TXT records for SSL certificate issuance.
- Create an API Token: Refer to the official Cloudflare documentation on how to create an API Token.
- Required Permissions: The token typically needs
Zone -> Zone -> ReadandZone -> DNS -> Editpermissions for the specific zone (your custom domain, e.g.,bndct.dev) that Caddy will manage. - Store the Token: It’s crucial to store this token securely. For Caddy, it’s often best to set it as an environment variable (e.g.,
CLOUDFLARE_TOKEN) on the server where Caddy is running.
3. Caddy Installation and Configuration
Caddy will act as your central reverse proxy. It should be installed on a server within your Tailscale network.
Caddy Installation: Install Caddy on your chosen server. You can use package managers (e.g.,
sudo apt install caddyon Debian/Ubuntu), Docker, or download pre-built binaries from the official Caddy website.Caddyfile Creation: Create a
Caddyfile(usually located at/etc/caddy/Caddyfileor in your working directory if running manually). This file defines your reverse proxy rules and SSL automation.Here’s an example
Caddyfilethat uses Cloudflare for DNS-01 challenges and proxies for Jellyfin:# This block defines how Caddy performs the DNS-01 challenge using Cloudflare. # It's a global snippet that can be imported into individual site blocks. (cloudflare) { tls { dns cloudflare {$CLOUDFLARE_TOKEN} # Use the environment variable for your token ca https://acme-v02.api.letsencrypt.org/directory } } # Define your custom domain for Jellyfin jellyfin.bndct.dev { # Reverse proxy requests to your internal Jellyfin service's Tailscale IP and port reverse_proxy http://100.123.68.68:8096 # Import the Cloudflare DNS challenge configuration defined above import cloudflare }Important:
- Replace
jellyfin.bndct.devwith your actual custom domain. - Replace
100.123.68.68:8096with the actual Tailscale IP address and port of your Jellyfin (or other) service. - Ensure the
CLOUDFLARE_TOKENenvironment variable is set before Caddy starts (e.g., in your systemd service file, Docker Compose file, or shell profile).
- Replace
Running Caddy:
- For testing, you can navigate to the directory containing your
Caddyfileand runcaddy run. - For production, it’s recommended to run Caddy as a system service (e.g., using
systemdon Linux) to ensure it starts automatically and runs persistently.
- For testing, you can navigate to the directory containing your
4. Cloudflare DNS CNAME Record Setup
Even though access occurs over Tailscale, you still need public DNS records to direct traffic to Caddy’s Tailscale IP. In this setup, a wildcard CNAME record simplifies management for multiple services.
Create a Wildcard CNAME Record: In your Cloudflare DNS management panel for
bndct.dev, create anCNAMErecord for the wildcard entry (*) that points to the Tailscale name of your Caddy server. This ensures that any subdomain (e.g.,jellyfin.bndct.dev) will resolve to your Caddy server.Type Name Content Proxy Status TTL CNAME *caddy.rohu-ruffe.ts.netDNS Only Auto - Name: This should be
*(the asterisk). - Content: This must be the Tailscale name of your Caddy server.
- Proxy Status: Ensure this is set to “DNS Only” (gray cloud icon) as Cloudflare’s proxying would interfere with Tailscale.
- Name: This should be
Once these steps are completed, your client device, when connected to Tailscale, should be able to resolve your custom domains and securely connect to your homelab services via Caddy.